
Probably not the best stock photo for this article, but hey, who doesn’t love the oil industry?
If you’ve followed my last few posts you have now used Terraform to create a Google Kubernetes Engine cluster, and you’ve deployed Jenkins (with the Blue Ocean pipelines plugin) to your cluster with Helm. If you’ve missed any of these steps, please refer to those posts to catch up. To complete our journey we will now build a pipeline in Jenkins to manage future changes to our infrastructure.
Pipelines Link to heading
What is a pipeline exactly? The traditional or literal interpretation is that it’s a way to pipe something from one place to another. In computing we bend that a bit to reference a way we move something (perhaps a code change) towards something else (say, our infrastructure). In this context it almost always comprises a set of linear steps, or tasks to get from A to B.
We typically see pipelines referred to as part of Continuous Integration, which at its most basic is simply the practice of frequently merging developer changes into a code mainline repository. A pipeline is often triggered by a code change (like a post-commit hook in git) and can help merge that change by providing testing, approval and deployment stages.
Recall that at the beginning of this series we argued for the benefit of defining infrastructure as code. Now we’re all caught up, let’s set up a pipeline in Jenkins to deploy changes to that code.
Agent Containers Link to heading
The Helm chart we used in the previous guide has helpfully installed the Kubernetes plugin for Jenkins, which means our pipeline jobs will run in pods on our cluster, and we don’t have to worry about managing standalone Jenkins agents. However the agent image won’t contain the terraform binary that we need to manage our infrastructure code.
Rather than building a custom “kitchen sink” agent, we can configure additional container templates for the Jenkins Kubernetes plugin to use. This means you can run multiple lightweight containers with the tools you need to accomplish your task, all within the same pod and with access to the same Jenkins workspace.
Let’s configure a container template for Terraform. Login to your Jenkins UI and navigate to Manage Jenkins > Configure System. Scroll down to the section for Cloud > Kubernetes, then look for Kubernetes Pod Template and Container Template. You can see the jnlp slave image configured here.
Click Add Container > Container Template and use the following values:
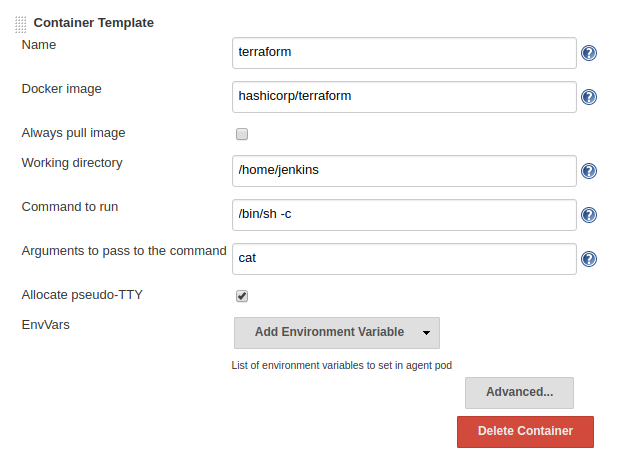
Then click Save at the bottom of this page.
Now we’ve configured our agents to use Terraform, there are just a couple of other bits of configuration we need to do.
Service Account Link to heading
Jenkins needs credentials that it will use in its pipeline so that Terraform is authorised to control the resources in our infrastructure. If you recall from the first post, we already have a service account key in the form of a JSON file that we have used with Terraform on the command line (go back to that post and follow the steps if you need to recreate the service account and key).
We can add this to Jenkins’ own credentials store, and reference it later in our pipeline.
Back in the Jenkins UI, navigate to Credentials > System > Global Credentials then click Add Credentials, then:
- From the Kind drop down select Secret text.
- Leave the Scope as Global
- Specify the ID of
terraform-auth
For the secret itself, we need to base64 encode the file. This converts the multi-line JSON file into a single large string that we can copy and paste into the secret. Hopefully your system has the base64 tool, if not please Google how to install it :-) Then in the same location as your serviceaccount.json file, run:
base64 serviceaccount.json
Copy the entire string and paste it into the Secret box, then click OK.
Git Link to heading
We need a way to share our code with Jenkins, so it’s time to commit your working directory to a hosted git repo. This can be Github, BitBucket, Gitlab or any other hosted git service, providing Jenkins can see it across the Internet. I’ve used Github:
https://github.com/timhberry/gke-tf-tutorial
Make sure you include the .gitignore file. Borrow the one from my repo if you like. You do not want to commit your service account to git.
Remote State Link to heading
We also need to take a quick segue back to Terraform school to learn about remote state. Previously when we’ve run Terraform, you’ll notice that some state files get written to our local directory. Terraform uses these to make its graph of changes every time it runs. So if we run Terraform in a fancy container in a pipeline, where does it write its state file?
The answer is to store the state in a bucket in the project itself. Then anyone can run Terraform in the pipeline and the remote state is centrally stored and shared. Terraform will also manage locking of the state to make sure conflicting jobs aren’t run at the same time.
So let’s create a Google Cloud Storage bucket (change your-project-id accordingly):
gsutil mb -c regional -l europe-west1 gs://<your-project-id>-tfstate
Now we need to define a remote backend in our Terraform code. Create the following backend.tf file, again using your own project ID:
terraform {
  backend "gcs" {
    bucket = "<your-project-id>-tfstate"
    credentials = "./creds/serviceaccount.json"
  }
}
Your working directory should now contain the following files (again, just go back over the previous posts if you’re missing anything):
.gitignore
creds/serviceaccount.json
backend.tf
gkecluster.tf
provider.tf
Next run terraform init. If you still have your local terraform.tfstate file Terraform will helpfully offer to copy your local state to your new remote backend (you can respond with yes).
You can now remove the local terraform.tfstate and terraform.tfstate.backup files. From now on, Terraform will manage it’s state with the GCS bucket we created. Add all the remaining files to your repo, commit and push them.
Jenkinsfile Link to heading
We made it back to Jenkins! It’s time to create a pipeline. In Jenkins, pipelines are written in groovy (a sort of scripting language spin-off of Java that nobody asked for). They can be scripted, using most of the functionality of the groovy language, or declarative, which is much simpler. Copy the Jenkinsfile from my repo above and add it to your own. I’ll describe the parts of it below:
pipeline {

  agent any

  environment {
    SVC_ACCOUNT_KEY = credentials('terraform-auth')
  }

  stages {
At the beginning of the file we are declaring that this is a pipeline and we don’t care what agent it runs on (because the Kubernetes plugin will manage that for us). We can define environment variables for our agents in the environment section, and here we call the credentials groovy function to get the value of the terraform-auth secret we set earlier. Then we’re ready to define the stages of our pipeline:
    stage('Checkout') {
      steps {
        checkout scm
        sh 'mkdir -p creds'
        sh 'echo $SVC_ACCOUNT_KEY | base64 -d > ./creds/serviceaccount.json'
      }
    }
In this stage the Jenkins agent checks out our git repo into its workspace. It then creates the creds directory and base64 decodes the secret that we set as an environment variable. The workspace now has a creds directory and serviceaccount.json file just like our local directory does.
    stage('TF Plan') {
       steps {
         container('terraform') {
           sh 'terraform init'
           sh 'terraform plan -out myplan'
         }
       }
     }
In this next stage we perform our Terraform planning, in exactly the same way we have previously in our local environment. We’re specifying the terraform container template that we added earlier, so this stage will run with that image in the same pod as our Jenkins agent container, and write to the same workspace.
    stage('Approval') {
      steps {
        script {
          def userInput = input(id: 'confirm', message: 'Apply Terraform?', parameters: [ [$class: 'BooleanParameterDefinition', defaultValue: false, description: 'Apply terraform', name: 'confirm'] ])
        }
      }
    }
This stage is optional, but it pauses the pipeline and waits for the approval of a human operator before continuing. In this example, it gives you a chance to check the output of terraform plan before applying it. Note that the script function lets us break out of the simplified declarative pipeline stuff and write some native groovy script.
    stage('TF Apply') {
      steps {
        container('terraform') {
          sh terraform apply -input=false myplan'
        }
      }
    }
  }
}
Finally this stage applies the terraform plan that was previously created, again using the terraform container template.
Once you’ve created this file and committed it to your repo, we’re ready to add the pipeline to Jenkins.
Adding the Pipeline Link to heading
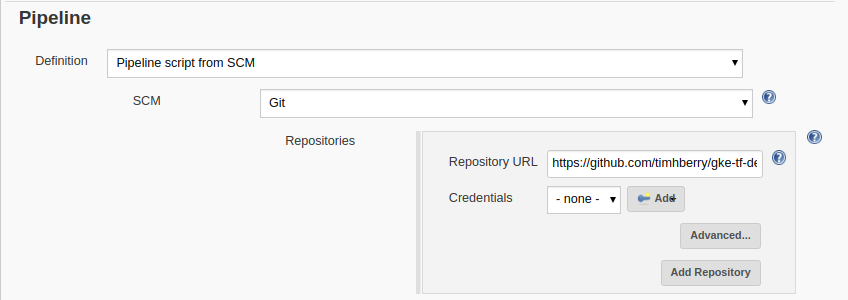
Back in the Jenkins UI, select New Item from the homepage. Specify that this item is a Pipeline and give it a name, then click OK.

On the next page you’re presented with lots of configuration options. All we need to do for now is tell Jenkins that it can find the Pipeline in a repo. Scroll down to the Pipeline section, and select Pipeline script from SCM, then choose Git and enter your repository URL. Then click Save.
Jenkins adds the Pipeline and throws you back to its homepage. Now for the fancy stuff. If you think the Jenkins UI looks a bit web 1.0, get ready to be impressed. Select Open Blue Ocean from the menu on the left.
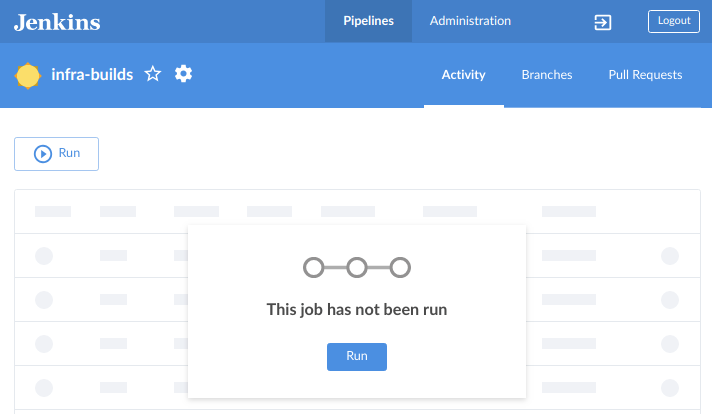
They must have got my letters!
It’s like a whole new world! And it gets better. Click Run. You’ll be notified that a job has started, and you can click it to watch the progress. It might take a few moments the first time you do this. Jenkins is asking GKE to fire up an agent container, and it will need to grab the necessary images from Docker Hub on the first run.
You get a nice visual representation of the pipeline from this UI. When we get to the approval stage, Jenkins will wait for your input. At this point you can click back on the TF Plan stage and make sure you’re happy with the plan that is going to be applied. Since we created our remote state backend, Terraform should know there are no changes to make, unless you’ve altered your Terraform code.

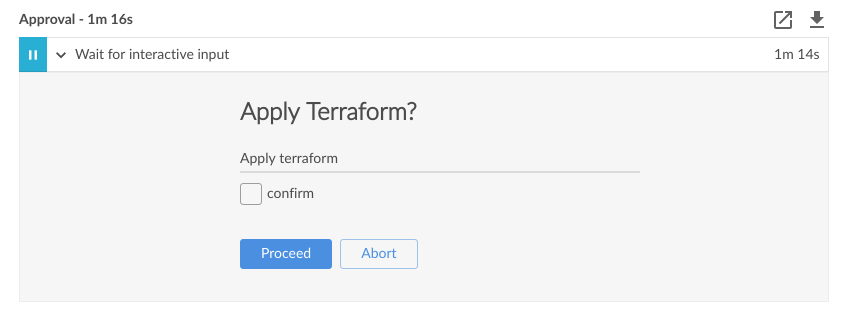
If you’re happy with the plan, go ahead and give your approval. Everything should go green and give you a warm fuzzy feeling inside.

The best!
This is So Much Work! Link to heading
Well, it can be the first time. Once you get into the habit of doing things this way though, it really takes no time at all to set up these tools and processes. It’s worth the effort because you gain a lot using this GitOps/DevOps approach:
- Everything is done via git, which makes team collaboration more effective
- Pipelines can integrate dependencies, tests, other builds, whatever is necessary to make your deployment work the way it should
- Jenkins maintains a history of changes, build stages, pipeline runs and deployments
Needless to say, you can build pipelines for anything, not just Terraform. In fact it’s much more common to use them for application deployment than infrastructure life-cycle management. But anytime you have to get some code from A to B, a pipeline is probably the way to do it.
What’s Next? Link to heading
In a real-world environment, you should trigger pipelines like this from a git commit. This can be done with a post-commit hook that calls the Jenkins API. You can read more about Jenkins pipelines at their website. If you need to deploy a certain kind of app, google around and the chances are someone has built a pipeline for it.
You may also want to consider GitLab CI as an alternative to Jenkins. It arguably has a much more powerful and clearer Pipeline syntax, and tightly integrates the pipeline process with the repo itself, by hosting both.
I hope you found this series of posts helpful! This last chunk was bigger than I thought it was going to be, so if you spot any errors in it please let me know.