
Updated December 2019 and with a catchier title, the original form presented here purely for search-engine optimisation: “Deploy a highly available shared storage service in Google Kubernetes Engine with Regional Persistent Disks and NFS”.
That title is indeed a mouthful, but it sums up what we’re trying to accomplish here. Highly available, distributed and shared storage is surprisingly difficult to achieve and as we move towards a world of massively deployed, immutable and loosely coupled micro-services, we often forget that somewhere along the way a PHP developer is going to ask for their thousands of deployed web applications to all read and write from the same block file system (for images, it’s always for images). At this point you have a few options:
- Tell the developer to use object storage
- Pay through the nose for a managed service, the benefits of which under the hood will be debatable, but at least hidden from you
- Cobble something together yourself
In the Googley world of GKE where I live, I did a moderate dance last year when Cloud Filestore was announced as a fully managed shared storage platform. Sadly, this is still a zonal resource, so in the event of a zonal failure there is no redundancy for volumes. I refuse to stand up another GlusterFS cluster and you can’t make me, but fear not! You can use regional persistent disks and that good old friend of ours: NFS. Let’s get started!
Create the Regional Cluster Link to heading
First we’ll fire up a regional GKE cluster with Terraform. If you haven’t done this before, you can check out my article Learn Terraform by deploying a GKE cluster.
Make sure you have the necessary prodiver.tf and serviceaccount.json files (by going through the above tutorial if necessary), then create the following nfs-cluster.tf file:
Now you can initialise, plan and apply this Terraform to create your Kubernetes cluster:
terraform init
terraform plan -out myplan
terraform apply myplan
A few minutes later you should have a regional GKE cluster up and running! Now you can configure your local kubectl with gcloud:
gcloud container clusters get-credentials nfs-test --region us-east1
Storage Classes and Regional Disks Link to heading
Now our cluster is up we will create a regional disk for our NFS server to use. Google Regional Persistent Disks are slightly more expensive, but are automatically replicated across two zones. By default our GKE cluster will only contain a Storage Class for standard persistent disks, so we’ll need to create new one. Create the following storageclass.yaml:
We use the Google persistent disk provisioner but specify a replication type, and that the disk should be replicated across us-east1-b and us-east1-c. This is why we built our regional cluster in us-east1. There are more than two zones in that region of course, but we’ll deal with that shortly.
Create this resource with this command:
kubectl apply -f storageclass.yaml
Now we’ll create a Persistent Volume Claim that creates a 10Gb disk with our new Storage Class. Create the following nfs-pvc.yaml:
We reference the name of our storage class here, which we called repd-east1-b-c, and ask for a 200Gb disk. This sounds like a lot for our little tutorial, but it’s the minimum size we can provision. This access mode is ReadWriteOnce because only our single NFS server will access the volume directly. Create this resource with this command:
kubectl apply -f nfs-pvc.yaml
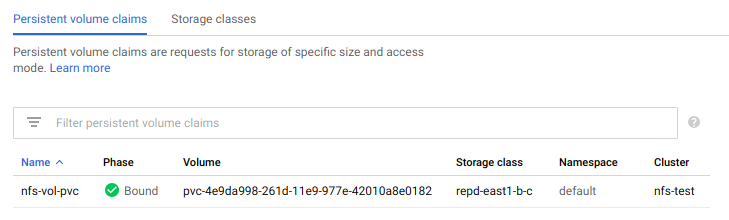
In the Kubernetes Engine section of the Google Cloud Console, under Storage, we can now see our Persistent Volume Claim, backed by our replicated Storage Class:
Awesome! Now on to deploying our NFS server.
The NFS Server Link to heading
We will use a Kubernetes Deployment to create our NFS server, containing a single pod running the itsthenetwork/nfs-server-alpine container image. This is a stripped down Alpine Linux that only supports NFSv4 over TCP port 2049, which makes it a lot easier to use than traditional NFS servers that may randomly portmap connections.
Create the following nfs-deployment.yaml manifest:
Deployment manifests can look a bit daunting but if you break them down they’re easy enough to understand. As we stated earlier we are deploying a single pod containing the nfs-server-alpine image. We expose TCP port 2049 and specify a directory to share.
We specify the Volume nfs-vol for this directory and use the Persistent Volume Claim we created earlier to provide it. The main thing to note in this deployment is the affinity section.
GKE Regional Clusters will run nodes in the available zones of the region you specify, so for us-east1 we currently have 3 nodes. But we know a Regional Persistent Disk can only be replicated across 2 zones, and in fact we specified which zones to use earlier when we created the Storage Class.
The use of nodeAffinity in this section ensures that our NFS server deployment will only be scheduled on nodes in either us-east1-b or us-east1-c which reduces our total availability a bit, but still gives us redundancy in the event of a zone failure.
We’ll now make a Service object which will provide a ClusterIP that our clients can use to access the NFS server. Create the following nfs-service.yaml file:
You can add the deployment and the service to your cluster with these commands:
kubectl apply -f nfs-deployment.yaml
kubectl apply -f nfs-service.yaml
Wait a few seconds then run kubectl get pods and you should see your NFS pod running quite happily:
NAME READY STATUS RESTARTS AGE
nfs-server-6f4cd454d7-dgpqx 1/1 Running 0 18s
Now run kubectl get svc to see your NFS service:
NAME TYPE CLUSTER-IP EXTERNAL-IP PORT(S) AGE
kubernetes ClusterIP 10.23.240.1 <none> 443/TCP 1h
nfs-server ClusterIP 10.23.244.149 <none> 2049/TCP 10s
A Quick Web Page Link to heading
Before we launch our web servers, we need to create an HTML page for them to serve. If we don’t, they’ll attempt to serve a directory listing of our NFS volume, get a security error, and crash! This isn’t exactly best practice, but you can get a shell directly to the NFS server and write something in that directory. Get the pod name from the kubectl get pods output earlier and execute a shell on it like this:
kubectl exec -it nfs-server-6f4cd454d7-dgpqx -- /bin/bash
Replace nfs-server-6f4cd454d7-dgpqx with the name of your pod. Now you are connected to that container, change into the shared directory and write a quick bit of HTML:
cd /nfsshare
echo "<h1>Welcome to NFS</h1>" > index.html
exit
The NGINX Deployment Link to heading
Now we’re ready to launch our fleet of web servers. First create the nginx-deployment.yaml file:
Apply this with kubectl apply -f nginx-deployment.yaml
In this deployment we’re consuming a Volume using the local NFS service we’ve just created, and mounting this where NGINX normally expects to find HTML files. Note that we are including a livenessProbe: This probe attempts regular HTTP gets on the pod, and if there is no response the pod will be marked as unhealthy and restarted.
We can now expose our NGINX deployment to the outside would via a native Load Balancer with a service definition. Create the nginx-service.yaml file:
Apply this with kubectl apply -f nginx-service.yaml
It will take a few minutes for the Load Balancer to assign an external IP address. You can keep an eye on it with kubectl get svc and see your NGINX service exposed alongside your NFS server. Eventually an external IP address will show up in the output:
NAME TYPE CLUSTER-IP EXTERNAL-IP PORT(S) AGE
kubernetes ClusterIP 10.23.240.1 <none> 443/TCP 2h
nfs-server ClusterIP 10.23.244.149 <none> 2049/TCP 1h
nginx LoadBalancer 10.23.252.242 35.237.154.7 80:31492/TCP 2m
Put that IP address into your browser and you should see the message Welcome to NFS that we entered earlier!

Magic!
Simulating a Zone Failure Link to heading
We now have an NFS service providing a regional disk as a volume to a small deployment of NGINX replicas. Our NGINX deployment is spread across our GKE cluster and could scale to many more pods if we wanted it to. Now let’s get to the whole point of this exercise: surviving a theoretical zone failure.
In reality a zone failure is a rare event, but in any system design you want to ensure that services still remain available to users in the event of any outage. In our design, the disk is replicated across 2 independent zones, and we can trust the Kubernetes scheduler to move the NFS server itself if a zone disappears. But enough theory, let’s simulate a zone failure and see if it works!
Simulating this failure is actually quite destructive. To make the Kubernetes scheduler believe that a node in a zone is suddenly unavailable, we will delete the instance group for a node entirely. Once the scheduler realises the node has gone, the NFS server (and any other pods) will be rescheduled to other nodes. Note that this is a destructive test — there is no easy way to recreate that instance group. But thanks to the magic of Terraform, you can simply delete the entire GKE cluster and recreate it in a few minutes.
First we need to identify the node currently serving our NFS pod, which you can do with this command:
kubectl get pod -o=custom-columns=NODE:.spec.nodeName,NAME:.metadata.name
You should see an output like this:
NODE NAME
gke-nfs-test-default-pool-deb8ca25–7xm4 nfs-server-6f4cd454d7-dgpqx
gke-nfs-test-default-pool-deb8ca25–7xm4 nginx-deployment-7d7555675f-kzglk
gke-nfs-test-default-pool-b4b13dfd-hzrr nginx-deployment-7d7555675f-nrg48
gke-nfs-test-default-pool-077dfcb2-vlkj nginx-deployment-7d7555675f-qf62t
Which in our case shows the nfs-server-6f4cd454d7pod is running on the node called gke-nfs-test-default-pool-deb8ca25-7xm4.
In the Google Cloud Console we can easily locate this node in the Compute section. We will not be allowed to delete the node directly, but the console will direct us to the instance group that manages that node, and here we can simply select Delete Group.

It will take a few minutes for the Console to make these changes, and while that happens we can watch what happens to our pods with:
kubectl get pods -w
After a few more minutes we will see that the NFS server is being scheduled to run on another node. The Kubernetes scheduler has no concept of what we’ve just done to that node, just that it has disappeared and it needs to take some remedial action. The NFS server pod is recreated on an available node and our regional disk is remounted.
nfs-server-6f4cd454d7-dgpqx 1/1 Terminating 0 87m
nfs-server-6f4cd454d7-bnpht 0/1 Pending 0 0s
nfs-server-6f4cd454d7-bnpht 0/1 ContainerCreating 0 2m37s
nfs-server-6f4cd454d7-bnpht 1/1 Running 0 5m38s
At this point you might also see some NGINX pods erroring and restarting. If the NFS service becomes unavailable, an NGINX pod can’t serve files from its volume. The filesystem mount hangs and the pod is rendered useless. Thankfully, the liveness probe we created earlier is constantly checking for just this and will restart an NGINX pod into a healthy state if this happens.
After several minutes of flapping, all is good. The system has recovered itself from a catastrophic failure, and your web pages continue to get served!
Note: This might take a very long time. You may also see errors about being unable to attach the Volume to a different node, but they should resolve eventually.
A Pinch of Salt Link to heading
We have achieved a highly available shared storage service for Kubernetes. But please don’t take this as a production ready solution! We have a single pod serving NFS and we have made no calculations about how much performance it could provide under load. Additionally, the failover process is a little bit too lengthy for my tastes, but it should mean a service would recover inside the SLA that you would normally have to worry about with a pager.
The idea here has been to get a simple shared storage service to be mostly highly available, and to learn some more Kubernetes concepts along the way. Hopefully this is a good starting place for you to explore further!
Don’t forget to clean up any resources you’ve created in your GCP project to avoid incurring charges.