It's Python on the Internet!
Updated December 2019
I’ve been a fan of Cloud Functions for a while and a fan of Python since forever, so when support for Python functions was finally announced at Google NEXT’18 I did a small dance of celebration (or at least, I fist-bumped the air when no one was looking). I’m sure you know what Python is, but if you’re new to the serverless world we’re now living in, a quick re-cap on Cloud Functions:
Cloud Functions are small pieces of code that execute in an event-driven manner. They do one small thing very efficiently in reaction to a trigger — usually an HTTP request. The neat thing is you manage zero infrastructure and usually only pay for the execution of your function and a few seconds of compute. You may have heard of other Functions-as-a-Service offerings such as AWS Lambda.
Writing Python cloud functions is easy and fun, as I will now demonstrate. To follow this tutorial you’ll need a Google Cloud Project (you can sign up and get free credits here), a local Python development environment and the gcloud SDK.
Hello, World Link to heading
We can create a simple function by creating a main.py with just 2 lines:
def hello_world(request):
    return 'Hello, World!\n'
You can deploy this as a cloud Function with the following command. Note that the cloud function name matches the name of the function we defined in code: hello_world
gcloud functions deploy hello_world --runtime python37 --trigger-http
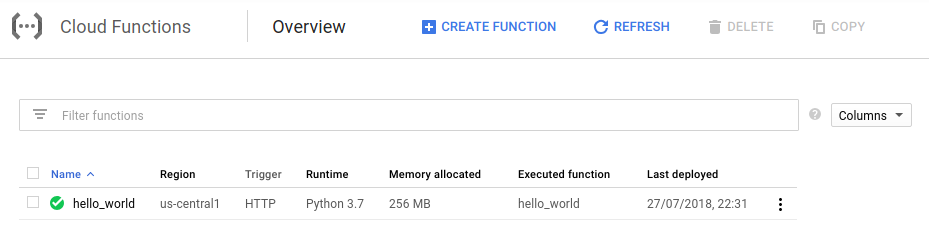
After a couple of minutes, the command will return the httpsTrigger or URL for your function. Try accessing this URL and you’ll see the message “Hello, World!” returned. You can also see your function in the Cloud Console UI:
But this is pretty boring stuff, let’s make the function do something a bit more interactive. Update your main.py to the following:
def hello_world(request):
    request_json = request.get_json()
    if request_json and 'name' in request_json:
        name = request_json['name']
    else:
        name = 'World'
    return 'Hello, {}!\n'.format(name)
You can use the same gcloud functions deploy command as before to update your function. After a couple of minutes, try accessing the URL again and you’ll get the same message. But now try sending it a POST with some data:
curl -X POST <your function URL> -H "Content-Type:application/json" -d '{"name": "Derek"}'
And you should receive a custom message in return! The runtime for Cloud Functions uses the Flask library and provides us with a Request object that we can manipulate however we like.
A More Useful Example Link to heading
This is all great fun, but now let’s do something useful to show a real world example of where you might employ a Cloud Function. As we’ve seen, Functions are typically triggered by HTTPS endpoints, however you can also make use of Background triggers. Functions deployed this way have no HTTPS endpoint, and are effectively hidden from the Internet, but will instead execute in response to an event such as a file being uploaded to a storage bucket, or a message being sent to a Pub/Sub topic.
Let’s say we have a web service that writes images to a Cloud Storage Bucket. Every time an image is uploaded, we’d like to create a corresponding thumbnail image. Arguably this could be part of our main application code, but for the sake of argument let’s say we want to run this as a separate function, because there may be other ways that images end up in the bucket (maybe an external service sends them to us in batches).
Let’s write a function that reacts when a new file is written to a Cloud Storage bucket. You’ll need 2 GCS buckets for this: You’ll upload images into the first one, and your function will write thumbnails into the second one. In a new directory, create a new main.py file:
from wand.image import Image
from google.cloud import storage

client = storage.Client()

THUMBNAIL_BUCKET = '<your thumbnail bucket>'

def make_thumbnail(data, context):
    # Get the file that has been uploaded to GCS
    bucket = client.get_bucket(data['bucket'])
    blob = bucket.get_blob(data['name'])
    imagedata = blob.download_as_string()
    # Create a new image object and resample it
    newimage = Image(blob=imagedata)
    newimage.sample(200,200)
    # Upload the resampled image to the other bucket
    bucket = client.get_bucket(THUMBNAIL_BUCKET)
    newblob = bucket.blob('thumbnail-' + data['name'])
    newblob.upload_from_string(newimage.make_blob())
Notice that we’re importing modules, just like we would do with any other Python application. Cloud Functions uses pip, which means we can specify the dependencies we need in a requirements.txt file:
google-cloud-storage
Wand
Just keep your requirements.txt file in the same location as your main.py when you deploy your function.
Don’t forget to replace <your thumbnail bucket> in the above code with the name of your own thumbnail bucket, and
gcloud functions deploy make_thumbnail --runtime python37 --trigger-resource <your source bucket> --trigger-event google.storage.object.finalize
Note: You can’t use the same bucket for both. Why? Because every time the function writes a thumbnail, it would trigger a new invocation of itself!
When you deploy this function you’ll notice we don’t get given a URL. Instead we’ve told the function to run when the google.storage.object.finalize event occurs in the bucket we specified. Let’s upload a picture of Derek the Dog to the source bucket:

Good boy Derek!
Check the thumbnails bucket, and you should see that the function has done its job and created a thumbnail for us!

You can inspect the magic under the hood by revisiting the Cloud Functions part of Cloud Console, where you can track the invocations of your function and even watch its logs in real-time.
Cloud Functions are perfect when you need small pieces of code to tie together larger pieces of a stack. Now that Google has added Python support, we have a huge and diverse ecosystem of functionality available to us to write functions. For more information, read about the Python runtime or follow all of Google’s How To guides. Thanks for reading!